Saturday, October 16, 2010

Holiday Card Keepsake Ornament

recycled holiday christmas card ornament
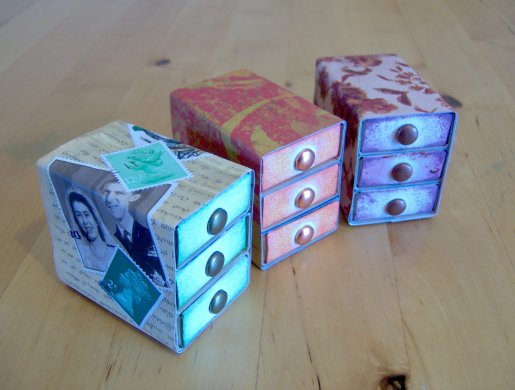
Hey everyone! I’m Nicole of Lillyella and I’m thrilled to be stepping in on Scoutie Girl this week to share a fun and easy post-holiday craft project with you. I’m sure I am not the only one who cringes just a bit when it’s time to throw away all the pretty holiday cards you received throughout the season, so today I’m going to show you how to make a lovely keepsake ornament out of them.
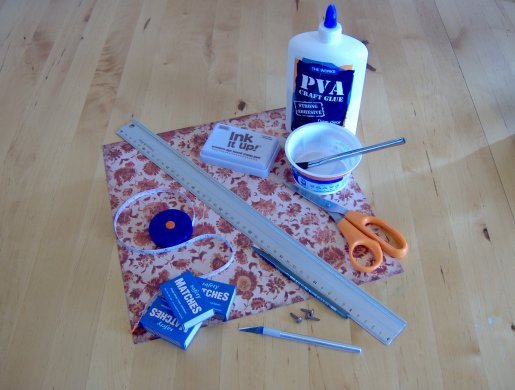
supplies for recycled holiday card ornament
What you’ll need:
  • Greeting cards
  • Hole punch, 1″ – 2″ (I used 1.5″)
  • Clear drying craft glue
  • Cardboard
  • Ribbon or cord
  • Ruler
  • X-acto knife
  • step 1-4 - recycled greeting card ornament 
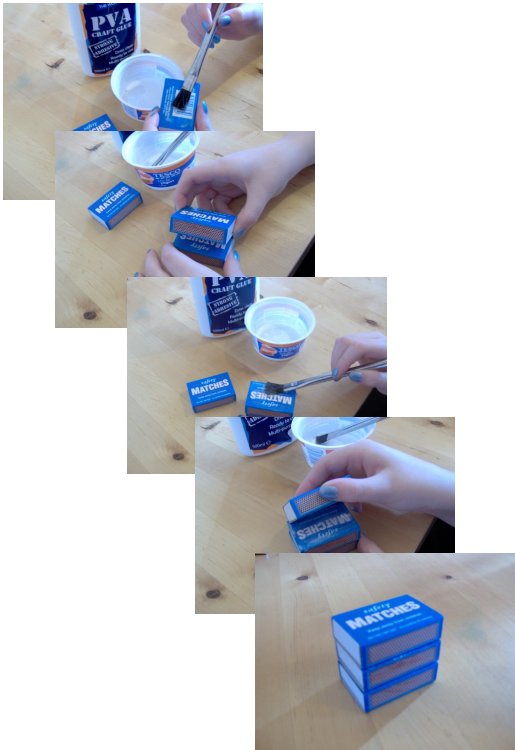
Begin by punching circles from your cards. If you do not have a hole punch, you can use something round to trace around, then cut them out by hand. You will need 20 circles for each ornament. Next draw an equilateral triangle the size of your circles. Click here to download a printable PDF of triangles for 1″, 1.5″ and 2″ circles. Cut the triangle out of a piece of thick cardboard. steps 5-8 - recycled greeting card ornament On the back of each circle, trace around the triangle. Using a straight edge and an X-Acto knife, score each line by gently cutting into the paper, but not all the way through. You can also use a scoring tool. Fold the three sides up as shown. steps 9-12 - recycled greeting card ornament 
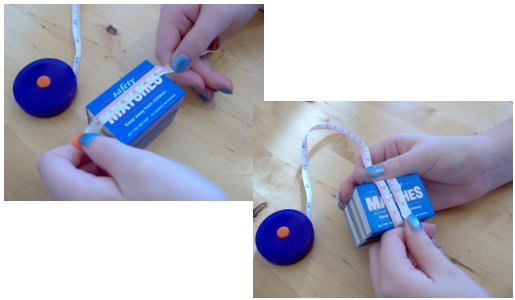
To form the ornament, begin by gluing 5 circles together with the points of the triangles all facing the same direction. This will be the top. Make a loop out of ribbon or cord for hanging the ornament and thread it through the middle of the five circles before the glue dries. Glue another five circles together to form the bottom. steps 12-15 - recycled greeting card ornament Next, glue the 10 remaining circles together, side by side with points in opposite directions. Then join the last circle to the first. This will form the middle of the ornament. Glue on the bottom followed by the top and you’re done! recycled holiday greeting card ornament Hang this pretty little ornament on your tree or a doorknob, or make it without the ribbon loop to display on a shelf or table. Make a few in different sizes for a nice display or even fill them with scented herbs before gluing the top on. You can make this keepsake anytime of year using birthday and anniversary cards, or even decorative papers — get creative! CREDIT:  Scoutie Girl

Wednesday, October 13, 2010

Matchbox Chest of Drawers

Matchbox Chest of Drawers


Things to make and do - Matchbox Chest of Drawers

These little matchbox chest of drawers are great for keeping small treasures in or as storage for stamps, buttons or even bugs (for all the boys out there!)


You will need:


3 matchboxes (empty)
Patterned paper or plain paper, decorated
PVA glue
Flexible tape measure or string
Ruler
Pencil
Scissors
Craft knife or bradawl
3 split pins (paper fasteners or brads)
Extra decorations (optional)
Things to make and do - Matchbox Chest of Drawers


What to do


1. Glue the 3 matchboxes on top of each other, making sure all the sides match up evenly. Leave to dry.


Things to make and do - Matchbox Chest of Drawers


2. Using a flexible tape measure (or a length of string), measure the length (from front of the drawer to the back) of a matchbox and then measure all the way around the sides of the 3 boxes.


Things to make and do - Matchbox Chest of Drawers


3. Using these measurements cut a strip of patterned paper (or you can use plain paper and decorate it).


Things to make and do - Matchbox Chest of Drawers


4. Spread PVA glue on the back of the paper and starting at the middle base of the bottom matchbox, wrap the paper around, joining up again at the base. Add any extra decorations (optional).


Things to make and do - Matchbox Chest of Drawers


5. Take out the drawers and using the tip of a craft knife or bradawl, carefully cut a small hole in the centre of each drawer front and add a split pin (brad/paper fastener). Add any extra decorations (optional).


Things to make and do - Matchbox Chest of Drawers


6. Slide the drawers back in making sure they are the correct way up.


Things to make and do - Matchbox Chest of Drawers


7. Your mini chest of drawers are now ready.


Things to make and do - Matchbox Chest of Drawers


CREDIT:  Things To Make And Do

Mod Podge Coaster Tutorial

DIY Mod Podge Coaster Tutorial
1. Purchase some tiles. I bought six of the cheapest tiles I could find in glossy white; it was under $2.
DIY Mod Podge Tile Coaster Tutorial
2. Trace your tiles onto your paper. I used these cute matryoshka and owl wrapping papers I found at the art supply store, but you can use any paper other than something printed on your inkjet printer (it will get all smeary):
DIY Mod Podge Tile Coaster Tutorial
3. Cut out the squares with an exacto knife – about 1/8″ to 1/4″ smaller then your square on each side – depending on how much tile you’d like to see as a border:
DIY Mod Podge Tile Coaster Tutorial
4. Apply a light coat of Mod Podge to each tile with a sponge brush, then center your paper on top. (Work on one tile at a time.) Use your fingers to press the paper nice and flat. Don’t lift it up once you get it on or it will rip and become a big ol’ mess. Let the tiles dry for 20 minutes.
DIY Mod Podge Tile Coaster Tutorial
5. While they are drying, cut out six squares of felt for the bottom of your coasters:
DIY Mod Podge Tile Coaster Tutorial
6. With your sponge brush, apply another light coat of mod podge to each tile. Let the coat dry for twenty minutes. Repeat this process five or six times.
DIY Mod Podge Tile Coaster Tutorial
7. When your tiles are dry, turn them over and glue the felt squares to the back.  I used rubber cement, but I think tacky glue would work too.  You could also use cork or those felt dots that normally go on the bottom of furniture legs.
DIY Mod Podge Tile Coaster Tutorial
Note: You can use your coasters the next day but don’t put anything HOT on them for a month – that’s how long it takes the mod podge to fully cure.  If you apply a sealant you can use them sooner, as per the directions on the sealant. (I used Polyurethane Spray.)
DIY Mod Podge Tile Coaster Tutorial
You’re done! Drink up!
DIY Mod Podge Tile Coaster Tutorial
*****

CREDIT:  Hostess With The Mostess

Envelope Accordion Book

Envelope Accordion Book


This easy to make accordion book is a personalized way to organize all of your small odds and ends. Each envelope page can hold something different such as- "to do" lists, stamps, tickets, coupons, and business cards. Also a fun craft idea for a gift - fill with photos, tickets, and other keepsakes and share with a special friend.

step one:
Choose your envelopes. You will need an odd number, anywhere from five to nine. We have used A2 envelopes here but, almost any size side-opening envelope will work.

step two:

 
Using a glue stick, adhere the envelopes together by placing adhesive on the inside of the flap of one envelope and using a bone folder, burnish it to the front of the next envelope.


step three:

 
Fold the pages accordion style, making the pointed flap of the first envelope the cover of your book.


step four:

 
Add a ribbon closure. Cut a small opening the width of the ribbon on both sides of the last envelope and run the ribbon through.


step five:

 
Using labels and colored gel pens indicate the contents of each envelope "page". Fill with all your odds and ends, fold up, and tie the ribbon closure to keep everything safely tucked inside. 


 Also, See their How-to Video to learn about a similar accordion project

 CREDIT: Paper-Source

Budget Terrarium


Terrariums seem to be getting a lot of attention these days and for good reason. These cute little planters can be a cute or classy addition to your living room or a fun project to share with kids. You can get almost everything you need to make them for cheap or free (if you forage).
Project Estimate:
  • Glass container, $1 or on hand
  • Rocks, $1 or on hand
  • Moss, scavenge outside or about $7 at the pet store (enough for a lot of terrariums)
  • Assorted decorations, on hand or homemade
Total: FREE and up
To begin with, you’ll need a small glass container. You can choose one with a lid or one without, as your terrarium can work either way. Most dollar stores carry at least some kind of cheap vase or small kitchen container that would work well for this purpose. If all else fails, you can use plastic, but glass really works better for this and it’s possible you may already have an appropriate container at home.
Next up, you’ll need to find some small rocks or pebbles to place at the bottom. I found some aquarium rocks, but pretty much anything that will allow for drainage and looks halfway decent will work, even those decorative floral marbles.
For the green part of your terrarium, the most common choice is moss. This is one thing you more than likely won’t be able to find at the dollar store (unless you have a really eclectic dollar store). You can buy moss at almost any pet store (it’s about $7 for a big bag) but if you really want to go cheap, even in the urban environment moss is in abundance in shady places. I found some samples underneath a train overpass that worked great and cost me nothing. You’ll just need a small layer of potting soil (really moss doesn’t need much) or dirt from a well cultivated part of your yard. I added more here for aesthetic sake.
Making the terrarium couldn’t be simpler. Make sure to put plenty of rocks in the bottom of your container. These will provide drainage and keep water from over saturating your moss. Many terrarium guides suggest adding charcoal, but I’ve had several terrariums do just fine without it though they were a little stinkier at first. On top of the rocks, place the soil and then a layer of your moss. To make it landscape like, you may want to create little hills and valleys. Once you’ve got it in place, press it down to make sure it’s in there good. I usually give the whole thing a little bit of water at this point so it all sinks in.
Now comes the fun part: decorating your little landscape. You can use just about anything to jazz up a terrarium. For kids, often small plastic toys can be an easy solution. I often prefer to make my own little decorations, however. If you can find some cheap modeling clay or Play-Doh-like substance, you can model little mushrooms like these. I let them sit out to dry, then painted their stems and spots when they were finished. Be creative and you may just fall in love with your miniature landscape.